Thursday, July 15, 2010

New Feature: Social Sharing Links

We have added Social Media Sharing Links to our Enhanced HTML Editor. You can instantly add buttons to your emails to Share via Facebook, Twitter, Google and  MySpace.


There are two ways to add social media buttons:

1. Click on the new Facebook or Twitter icon in the Enhanced HTML Editor to instantly add a button.


2. Click on the Social Links popup under Message Tools to add HTML code directly to your email.


To add sharing buttons directly to the HTML code, copy and paste the provided HTML code into your email.
  

How do social media sharing links work?

The buttons in the email will look like this:


When recipients click on the Twitter button, they will land on this Twitter page, which includes a link to the web page version of the email:


The Facebook button will bring recipients here and link to the web page version of the email:


The Google button brings recipients here. Recipients must fill out the details and Google will automatically link to the web page version of the email.


Recipients land here when they click on the MySpace button:


Wednesday, June 30, 2010

New Feature: See what device your recipients are opening emails with

We've added a new column to open-tracking reports -- you can now see what browser or device, known as the "email client", your recipients are opening your email with, including the iPhone, iPad, BlackBerry, Firefox, Safari, Internet Explorer, Chrome, and many other platforms.

Use this data to further personalize email campaigns. For example, use your open tracking reports to send a new email campaign with the Subject "Save 20% on next brownie order - for iPad users only" to just the people that opened your last email campaign with an iPad.

To access "email client" reporting data, to Reporting and then go to Opens from either your broadcast email campaign reports or your transactional email reports.


From the Raw Data view, you can see what email client each individual recipient opened the email with. Or, click the By Email Client tab to get aggregate totals on how many emails were opened per email client.

Transactional Email Opens Sample: See how many of each email client type was used to open emails in a specific Transactional Email Group.

Broadcast Campaign Raw Open Tracking Data: See exactly what email client was used to open the email for each recipient. Includes the technical Browser-Agent as well as the friendly name of the email client.

Friday, June 18, 2010

How to use JangoMail as an Email Discussion List service

Over the years, we've had many inquiries about whether JangoMail can be used as an email discussion list, also known as a "listserv". With some features we've recently added, it is possible to use JangoMail this way, and it's quite convenient.

First, what is an email discussion list?
  1. You setup an Email List of people in your organization.
  2. Using your regular email program like Thunderbird, Outlook, or GMail, you send an email to your-username@init.jangomail.com, and that email then gets propagated to everyone in the Email List that you setup in step 1.
  3. When people reply to your email, it can either go to everyone on the Email List, or just the person who wrote the original email. It's up to you, based on you have your account set up.
  4. Get open tracking, click tracking, DomainKeys/DKIM signing on all emails and replies sent to the entire Email List.
Email discussion lists are useful for organizations that want to have large group conversations over email. JangoMail is one of the few ESPs (Email Service Providers) to offer this feature.

This article assumes you know how to setup an Email List, but the basic steps are:
  1. Click on Lists tab.
  2. Create a new Email List.
  3. Define fields for your Email List.
  4. Import your email addresses and other fields into the Email List.
Using an Email List as an Email Discussion List

Once you've setup your Email List, now it's time to set the list up to be used as an email discussion list. Go to the "Settings" section and click on the edit icon next to Sending and Receiving --> Externally Launched Emails.


Here you will make appropriate changes such that your Email List can be used as an email discussion list. There are several settings that must be made:

  1. Leave From Display Name blank. If you enter a value here, then this will be the name that all the emails in the discussion will be "from" rather than the name of the person who wrote the email. If you're going to have an email discussion within your organization, you likely want each response to show as being from the person who wrote it.
  2. Set From Email Address to Of Email List. This will make it such that anytime someone starts or responds to the discussion, the From Email Address always be username@init.jangomail.com, forcing all replies to that address as well, which will make it so that each reply is propagated to everyone on the list. Note: If you want replies to the initial sender to go just to the sender, rather than to everyone on the list,then set this to Of Just Sender.
  3. Set List(s) to Send To to the Email List that you wish to be the discussion list.
  4. In the Tracking & Authentication tab, set Authenticate using to From Address, and choose the same Email List from the multi-select that you chose in step 3.


Your Email List is now setup as an email discussion list. Anyone in the list can send an email to everyone else in the list simply by composing and sending an email to username@init.jangomail.com, from any external email program, like Thunderbird, Outlook, or GMail for example. All replies will also go to the entire list, since replies will be directed to username@init.jangomail.com also. Only members of the Email List may send an email to username@init.jangomail.com for propagation to the rest of the list. If a non-member sends an email to username@init.jangomail.com, the email will be discarded.

Why use JangoMail as your Email Discussion List Service?

Using JangoMail over a traditional "listserv" service offers these benefits:
  1. Each message, from the original email to the list, to all replies, is tracked as an individual campaign, so you can get analytics, such as open-tracking and click-tracking on each email and each reply.
  2. All emails can be DomainKeys/DKIM signed.
  3. Verify delivery to recipients via SMTP Logs.
  4. Automatically have bounce-backs and removal-requests handled.

Monday, June 07, 2010

Better design for API homepage

We have re-designed the homepage of the API to be cleaner, more organized, easier to use, and easier to access documentation for each individual web service method. You can see the difference between the new and the old versions below.

Each method is organized into its proper category, has a link to a test form to call the method, and a link to the detailed documentation for the method.

New API homepage design


Old homepage design

Sunday, June 06, 2010

Improved email list segmentation performance

We re-wrote some code tonight that allows campaigns sent to segmented email lists using the "Filter/Send" feature process about 10x faster than normal. Additionally, our capacity for handling complex and very large segments is much greater now.

Previously, segmenting a list of 2 million email addresses, where the resulting segment was 1.5 million email addresses would cause memory errors on our end. But now, you can segment your very large email lists to your heart's content, and JangoMail will handle it fast and efficiently.

Screenshot of email list segmentation process

For more detail on JangoMail's advanced email list segmentation capabilities, see this PDF tutorial.

Thursday, June 03, 2010

HTML Editor Updates

Our HTML editor has been updated. The following fixes have been made:

  • Table cells incorrectly inherited rowspan and colspan from parent tables
  • Pasting rich text did not work on OS X 10.4
  • Custom attributes on
  • Editor did not save
    tags at the end of a paragraph correctly so they did not appear in browsers
  • NullPointerException when cleaning up spelling errors

User interface enhancements to Send Email page

Tonight we've enhanced the usability of the main Send Email page. The screenshot below outlines the improvements:


  1. There used to be two dropdown menus, one for re-sending an old message and another for editing an existing message. These two dropdowns have now been cominbed into one single dropdown with two buttons.
  2. You now have the option to enter a campaign ID manually rather than choosing from the dropdown. The dropdown has always only showed the 500 most recent campaigns. This was limiting to some of our users that needed to work with a much older campaign. Now, you can enter the ID number of any campaign in your account.
  3. Our new contextual help system shows a tooltip when you hover your mouse over the question mark. Look for more tooltips throughout the application as we adopt this system across all of the main tabs.
  4. You can FTP HTML files to client.jangomail.com/HTMLTemplates, and those HTML files will show in the last dropdown, and can be chosen to create an email campaign. Additionally, if you're using the High Impact Email for JangoMail desktop template management software, those templates will also appear in this dropdown. Note that this dropdown will only show if there is at least one HTML file in your FTP folder.

Wednesday, June 02, 2010

New password change process

In an effort to beef up security, we've enhanced the password-change process for an account. Previously, you could update your password on the same page under the Account Info page that you update all of your other contact information.

Now, there is a separate Change Password function, which requires you to enter your old password and enter your new password (twice) before a password change can take place.


New Feature: 101 new templates and editing software

I am happy to announce that a new email template set and a tool to manage these templates is available for download here:

http://www.jangomail.com/downloads/HIE5_JangoMail_Setup.exe

The download is over 100 MB, so it may take a few minutes to retrieve this file, depending on your Internet connection.

This software is called "High Impact Email for JangoMail". It is an email template management tool that comes with 101 email templates, and it works directly with your JangoMail account. During installation, you'll be asked for your JangoMail username and password, so have that handy.


Once you've downloaded and installed "High Impact Email for JangoMail", this is what the application will look like:

The software shows the categories of email templates on the left, and the actual email templates on the right. Select the email template you wish to use and hit the "Next" button on the lower-right.


The email template software will have already stored your JangoMail account username and password when you installed it. After you've selected and edited the template click the "Save to JangoMail" button in the lower right.

To find your new template in your JangoMail account, click the Messages link, click Compose New Message, then click With an Uploaded Template. Click the new template that was created in High Impact.

After selecting your email template, you can edit it within the JangoMail editor to make any final changes, before sending your email campaign:


We hope you find this new email template software useful.

Thursday, May 27, 2010

JangoSMTP now supports SSL/TLS

JangoMail has added support for SSL connections to our relay server from your email client of choice (e.g. Outlook, Thunderbird, Mac Mail, etc.). Just as when you use an HTTPS connection to connect to a website and make a secure online purchase, you can use the same technology to setup a secure connection with JangoMail and send email through your JangoSMTP account. This ensures your JangoSMTP username and password remain secure as they are transmitted between your computer and JangoSMTP relay servers. All that's needed to enable this feature a quick settings change in your email client.

Note: These instructions assume you already have your JangoSMTP account setup in your mail client. Follow these directions if you don't already have your mail client setup to send through your JangoSMTP account.

Outlook:

  1. Click on Tools -> Account Settings
  2. Highlight your JangoSMTP account and click Change...
  3. Click More Settings...
  4. Go to the Advanced tab
  5. Choose SSL in the Use the following type of encrypted connection: dropdown
  6. Change the Outgoing server (SMTP) port number to 465


Thunderbird:

  1. Go to Tools -> Account Settings
  2. Click Outgoing Server (SMTP)
  3. Choose the entry for relay.jangosmtp.net and click Edit
  4. Check the Use Secure Connection box and choose SSL/TLS from the Connection security dropdown


Mac Mail:

  1. Go to Mail -> Preferences
  2. Click on the Accounts tab
  3. Choose your JangoSMTP account at the left
  4. Click on Edit Server List... from the Outgoing Mail Server (SMTP) dropdown
  5. Select the entry for relay.jangosmtp.net and click on the Advanced tab
  6. Put a check next to Use Secure Sockets Layer (SSL)
  7. Select Use custom port and enter 465 as the value


Most modern email clients support SSL/TLS. If your email client is not listed above, open up your account settings configuration page and find the outgoing email server connection settings. The option you want to enable will be called SSL/TLS (not STARTTLS). Also look out for a default connection port. Generally this port number will be 25 or 2525 before you setup SSL/TLS, but it should be changed to 465 after the feature is setup. When in doubt, submit a support ticket and a member of the JangoSMTP support team will be able to assist you in choosing the right options.

Monday, May 03, 2010

How to use the API method SendMassEmail to connect to a website database

The SendMassEmail method of the JangoMail Email Marketing API is a versatile method that can launch an email campaign to recipients in a variety of ways. There are various "To" input parameters, each with its own use depending on where your email list data is stored.

The full specification of the method is located here. The "To" input parameters include:
  • ToGroups - send to an entire Email List - specify the name of an Email List (also called an Email Group) to send to. Specify multiple Email Lists separated by a comma
  • ToGroupFilter - sent to a segment of an Email List - specify the name of an Email List followed by a colon followed by a valid SQL filter (just the WHERE clause). For example, if you have an Email List called Contact List with the fields FirstName, LastName, and Company, then an acceptable input value would be "Contact List: Company = 'ABC Corporation'". An additional acceptable input value would be "Contact List: Company = 'ABC Corporation' OR FirstName = 'John'".
  • ToOther - specify a string of email addresses in any unstructured format. JangoMail will parse the data and pull out the email addresses and send to them. Optionally, pass structured data on-the-fly with field name and field value information, in order to send personalized emails to a dataset on the fly.
  • ToWebDatabase - pass in a SQL query (usually a SELECT statement) that will be executed against your web site database, in real-time, to pull down a list of email list data, to send a personalized email campaign.
This article will focus on how to use the ToWebDatabase input parameter.

In order to be able to use this feature, your JangoMail account first needs to know how to connect to your web database platform. There are two steps to this:
  1. You must create a Web Database Connection Profile. Create a Web Database Connection Profile under Lists --> Databases --> Add New Item --> Internet Web Database. If you're not familiar with creating a connection profile, see the detailed PDF guide.
  2. Then you must set this Profile as the Master Profile, so that the API knows that this connection profile is the one to use when you use ToWebDatabase. Set the Web Database Connection Profile as your Master Profile under Settings --> Integrating JangoMail with Other Systems --> Set Master Profile for Web DB. See screenshot below:


Set Master Connection Profile here.

If you attempt to call SendMassEmail and specify a value for ToWebDatabase without first having set a Master Profile, you will get this web service Exception:

MissingWebDatabaseSettings: There is no Master Web Database Connection Profile set for your account. This must be set prior to specifying a SQL query for the ToWebDatabase parameter.
Once you have set the Master Profile, you're ready to make the API call and pass in a SQL query in the ToWebDatabase input parameter. If you wanted to send to all email addresses that had been added to your database in the last 24 hours, for example, your SQL query might be:

select * from Accounts where AccountCreateDate >= dateadd(hh, -24, getdate())

And the full API call would look like the screenshot below:

Changes to web database connection settings

We made a change this weekend that affects all users that had set web database settings under Settings --> Web Site / DB Settings.

[This screen should no longer be used.]

Settings on this page were applicable when any of the following operations were executed:
  1. Synchronization of unsubscribes, bounces, opens, clicks, forwards with a web site database
  2. A call to the SendMassEmail or SendMassEmailPrevious2 API methods, while passing in a SQL query to the ToWebDatabase parameter.
Thus the settings were applicable for web database operations that occurred outside the normal JangoMail web interface (offline operations).

We have now replaced these settings with the ability to declare an existing Web Database Connection Profile as the Master Web Database Connection Profile. The profile chosen as the Master Profile will be the profile whose connection information will be used for the aforementioned "offline" operations.

[The "Master Profile" page should be used instead.]

If you had settings on this page, then a new web database profile has been created for you called Default Master Profile. This profile copies the settings from this page, and is already set as your default profile.


Only one web database connection profile can be declared as the Master Profile:


Web Database Connection Profiles can be created under Connect to My Database --> Connect to Internet Web Site Database. Once the profile has been created, it can be set to be the Master Profile under Settings --> Web Site Database --> Master Profile.

Note: If you are using a custom web database integration, it is important to correctly set the Variable Name that is the SQL Statement when you create your master profile. It is this variable that is substituted with the correct SQL statement when either of the two offline operations mentioned above are encountered.


For now, we have left the page "Web Site / DB Settings" in place, but we'll soon be removing this page from the interface completely.

Saturday, May 01, 2010

This blog has moved


This blog is now located at http://blog.jangomail.com/.
You will be automatically redirected in 30 seconds, or you may click here.

For feed subscribers, please update your feed subscriptions to
http://blog.jangomail.com/feeds/posts/default.

Tuesday, April 27, 2010

New Feature: Reset statistics for a Transactional Email Group

You now have the option to reset the statistics for any Transactional Group to all zeroes. This won't delete any of the data behind the statistics, but will just start counting all unsubscribes, bounces, opens, clicks, and complaints from zero again. So, you can still see all of the email address that unsubscribed, bounced, opened, clicked, and complained historically.


Why would you want to reset your statistics?

There are many reasons, but the most common one is if you're sending test emails as part of a Transactional Group, and you're ready to stop sending and start sending for real. You may not want the counts from the test emails counted in your official Transactional Group statistics.

Thursday, April 22, 2010

How to use the ASP.Net script file to integrate your web database with JangoMail

If your organization's web site and database platform is ASP.Net and SQL Server, JangoMail provides a file (w_5.aspx) which you may place on your web server, which allows JangoMail to pull email list data in real-time from your database, as well as update your database with recipient actions, like unsubscribes, bounces, opens, and clicks.

The steps are:
  1. Go to the Lists section and click on the Databases tab.
  2. Click Add New Item.
  3. Choose Internet Web Database and then choose the ASP.Net option.

  4. Retrieve the w_5.aspx file and place on your web server.

  5. Once you have the w_5.aspx file uploaded to your server, click Configure this connection.
  6. Fill in the variable names and values, including the SQL query to retrieve your email list data.

  7. Save the profile, and then click the Connect icon next to the profile name.

You may alter the w_5.aspx file as you see fit. For example, if your web site connects to SQL Server via ODBC instead of the default ASP.Net method, then you may modify the connection string in the w_5.aspx file.

Want to use this feature from the API?

Find out how in this blog post.

Further Reading

Detailed PDF Guide on Connecting to Internet Web Site Databases
Writing your own custom script file for any platform

Wednesday, April 21, 2010

How to write a custom web server script for JangoMail integration

JangoMail was one of the first and is one of the only email marketing service providers that can connect to a customer's web site database in real-time. Historically, we've supported and provided web server script files for 4 different scenarios:

Active Server Pages / ODBC Database -- w_1.asp
Active Server Pages / Microsoft SQL Server -- w_2.asp
Active Server Page / Microsoft Access -- w_3.asp
PHP / MySQL -- w_4.php

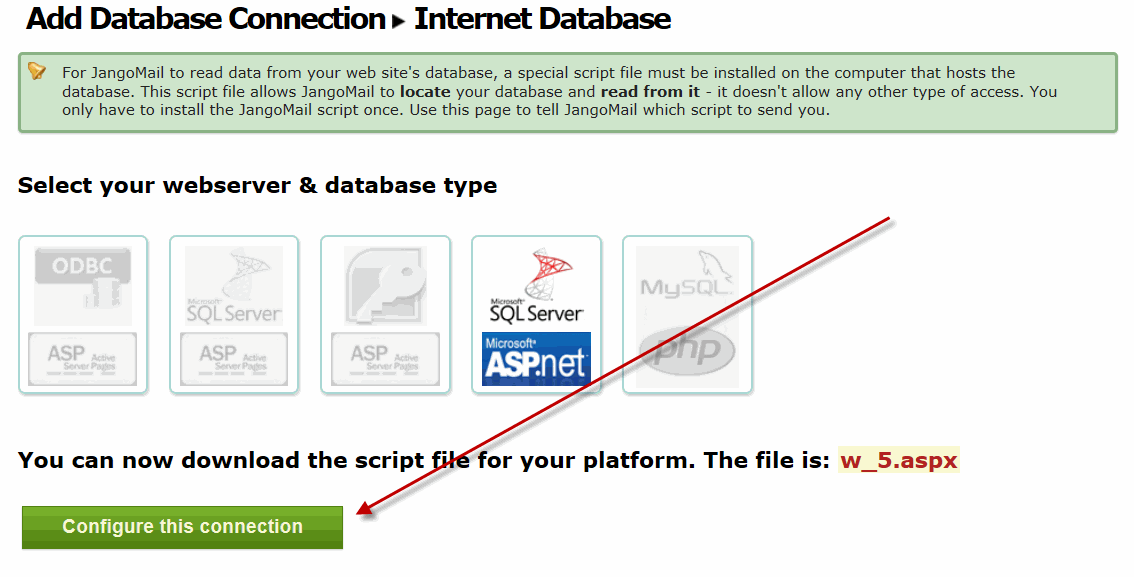
Recently, we added a fifth option:

ASP.Net page / Microsoft SQL Server - w_5.aspx

All five of these platforms and the five corresponding files are provided to you by JangoMail.

Still, many customers have web/database server that don't fit into one of these canned scenarios. Now, you have the ability to write your own web server script file, based on whatever platform you're running.

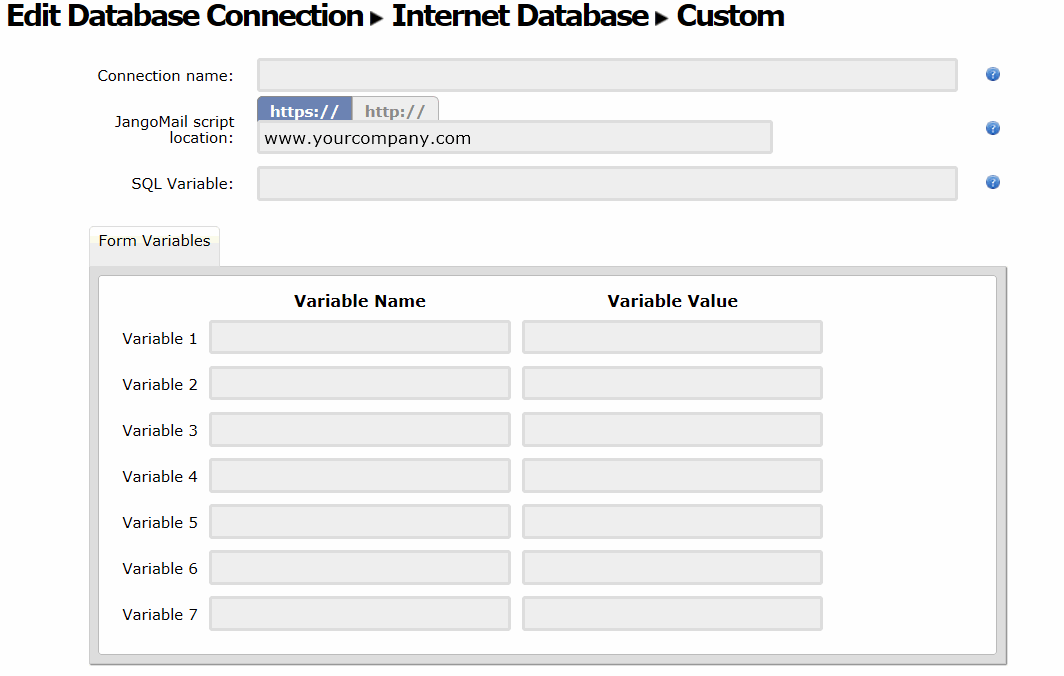
First, let's look at the screen in JangoMail where you plug in variable names and values that will be passed into your custom web server script.


Go to Lists --> Databases --> Add New Item


Select Internet Web Database and then ASP.net. 


Download the script file provided and upload it to your platform.
Then click Configure this connection.


Here you will enter your variable names and values.

There are seven variable names and values you may specify. You need not use all seven. For each variable name/value that you specify, your web server script file must be written to accept each variable as a FORM POST. The variable and its corresponding value will be passed to your script file. Note that the variable "action" will be passed always with the value "massmail". This informs your script file that the purpose of this call is to generate a set of data for a mass emailing (as opposed to a synchronization call which we'll cover later).

Once you've programmed your script to accept the variables and values via FORM POST, you must next program your script to generate data based on these variables. Example variables may be:

DatabaseName
DatabaseLogin
DatabasePassword
SQL

Based on your web/database platform, these four variables may be sufficient for your script to connect to your database and generate a set of email addresses and other corresponding data.

Regardless of the input parameters that your script takes, the script must generate your email list data in the following format:

FieldName1,FieldName2,FieldName3___ASDF---BREAKValue1WG0COLWG0Value2WG0COLWG0Value3WG0ROWWG0ValueAWG0COLWG0ValueBWG0COLWG0ValueCWG0ROWWG0WANGO-ENDOFDATASTREAM

Let's break this down and look at it more closely. The output the script should generate is:

1. The field names, separated by a comma.
2. Next, is a standard separator used by JangoMail to separate the field names from the field values: "___ASDF---BREAK"
3. Next comes the actual data, using a column separator of "WG0COLWG0" and a row separator of WG0ROWWG0 (and add an extra row delimiter at the end, before the "end of data stream" line).
4. Finally, at the end of the data string, end with "WANGO-ENDOFDATASTREAM"

For example, assuming you're passing in the correct parameters to connect to your database, and your SQL is:

select FirstName, LastName, EmailAddress from Users

and it returns two records, the output of the script should look like:

FirstName,LastName,EmailAddress___ASDF---BREAKJohnWG0COLWG0SmithWG0COLWG0johnsmith@yahoo.comWG0ROWWG0NateWG0COLWG0LakemanWG0COLWG0nlakeman@gmail.comWG0ROWWG0WANGO-ENDOFDATASTREAM

Therefore, using the example above with the four input variables, the screen would be filled in as follows:


This example assumes that I have called my script file JangoScript.do and that I've placed it in the root directory of www.browniekitchen.com. It also assumes that JangoScript.do is programmed to accept the five POST variables: action, DatabaseName, DatabaseLogin, DatabasePassword, SQL.


When you connect to that profile, JangoMail will connect to your JangoScript.do file, the script will output the data for the two records, and take you to this screen, where you can select your campaign to send to the two recipients:


Frequently Asked Questions
1. Do I have to pass in variables to my script file, or can I hard-code the values directly into my script file?

No, you don't have to pass in any variables to the script file, and you may hard-code them within the script file. The disadvantage to doing so are that a. This allows anyone that knows the script file exists to access it and have it output your email list data and b. It prevents JangoMail from synchronizing your database with unsubscribes, bounces, and other recipient actions, since the SQL query will be hard-coded within your script file, and the SQL query will be the query to retrieve email list data, not update it. A better solution may be to do a hybrid between the integration scenario presented above and hard-coding. For example, the database credentials could be hard-coded into the script file, while only the SQL query and a special password that is validated within the logic of the page is passed to the file by JangoMail.

2. Is this method of connecting to my data secure?

Yes. It is inherently secure if you opt to have JangoMail connect over https instead of http. It can be additionally secured by restricting the range of IP addresses allowed to connect to the custom script file. JangoMail's range of IP addresses are: 209.173.141.193 - 209.173.141.255

3. What is the purpose of the "action" variable name that is forced?

The action variable set to "massmail" tells the script file that this call is specifically to retrieve email list data for a mass emailing, as opposed to other possible actions, like those that synchronize the data with unsubscribe and bounce data.

4. Why does JangoMail need to know which of my variables represents the SQL string?

If you're only using the Web Database Connect feature to retrieve email list data via the web interface only (not the API), you can ignore this setting. This setting is only relevant if you wish to do one of the following:

a. Call the SendMassEmail API method and specify a SQL query in the ToWebDatabase input parameter.
b. Use any of the data synchronization options, like syncing unsubscribe and bounce data back to your database.

In both of these cases, a Master Web Database Profile must be set under Settings. And then, when JangoMail calls the SQL for either scenario a or b, the SQL for the scenario will be passed as the value of the variable rather than the value in the actual web database profile.

5. Where can I read more about this feature?

The following PDF was written when the Web Database Connectivity feature was first made available, and when it was only available on the first four platforms:

https://www.jangomail.com/documents/Public/JangoMail_Tutorial_Web_Database.pdf