Wednesday, February 23, 2011

New HTML Editor Option: TinyMCE is here!

We've just added a third choice of HTML editor to JangoMail, and it's a crowd favorite: TinyMCE. TinyMCE is a lightweight, powerful JavaScript-based HTML editor that loads fast. We'll continue to option our other two editors, the simple ActivEdit editor and the powerful Java-based EditLive editor as well. Most of the features we offered in the EditLive editor have been replicated in the TinyMCE editor, including:
  1. One-click ability to insert a CAN-SPAM footer, View as Web Page link, Twitter and Facebook sharing icons
  2. One-click ability to insert custom, pre-defined HTML snippets at the cursor location.
  3. Ability to load templates directly from the editor


Additionally, with the TinyMCE editor, you can switch between the Plain Text Editor and the HTML editor instantly, without having to re-load the page.

While the Java-based EditLive is still quite powerful, some users found it too slow to load and too clunky for rapid keystrokes. The TinyMCE editor is powerful, feature-rich, and lightning fast.

To set your account to use TinyMCE, begin composing a new message. Click the Settings Icon and choose the TinyMCE editor out of the three available options.


Thursday, February 17, 2011

New Feature: Restrict JangoMail SMTP Relay by From Address

We've launched a new feature that allows you to restrict who can use JangoMail via the SMTP relay service by From Address. Under Settings > Transactional > From Addresses, you may designate which email addresses and domains can send through the relay.


By default, all email addresses and domains can send through the relay.

You only need to specify From Addresses if you wish to restrict the relay to use just by certain people. If you wish to restrict the use of the relay to an entire domain, you can use the wildcard notation *@domain.com as the From Address to represent all addresses for domain.com.

Note: Specifying From Address restrictions only apply to emails sent through the SMTP relay, and not through the transactional email API.

Wednesday, February 16, 2011

New Feature: Delivery Optimization Tool

Ensuring good delivery of customer campaigns is of paramount importance here at JangoMail. We've blogged before about steps you as a user can take to help boost your deliverability. Now, we've taken it a step further and created a tool to help you see what you might be able to change to optimize delivery of your campaigns.

The new tool (fittingly named the "Delivery Optimization Tool" can be accessed from your Reports screen by clicking the ***Delivery Tools*** drop-down and choosing Delivery Optimization.


The Delivery Optimization Tool has two different modes of operation. In the first, the tool will analyze the most recent domains you've used for sending in both JangoMail and JangoSMTP; in the second, you can analyze a specific domain. The former is good for general use while the latter is handy if you are setting up a new domain that you have not yet sent from and want to verify you've taken all the correct steps for delivery optimization.


Make your selection (and enter a domain name if applicable) and click the Optimize button to start the analysis. You'll get a report listing any steps you should consider to help improve delivery. And of course, if you need any assistance implementing the steps outlined in your report feel free to contact your JangoMail / JangoSMTP support team.


Friday, February 11, 2011

New Feature: Merge two Email Lists

We've just launched a new feature under Lists that allows you to merge one Email List into another. You can do this via the web interface by going to the Lists tab, selecting the destination Email List for which you want to merge into, and visiting the List Tools tab. There you select Merge email lists and then select the source Email List whose members should be merged.


Notes: The email addresses in the Source Email List will then be copied to the Destination Email List. The Source Email List will not be modified. If the two Email Lists have different fields, then only the fields they have in common will be copied.

Web Service Method

You can also merge Email Lists with the API, using the MergeEmailLists method:


  • MergeEmailLists
    Merges two Email Lists by copying the List members from the Source List to the Destination List. Returns a String.

  • Wednesday, February 02, 2011

    New SMTP Relay option to preserve custom headers

    We have launched a new feature that will give you the option to preserve custom headers when using the JangoMail SMTP relay at relay.jangosmtp.net. To enable this option, go to Settings --> SMTP Relay, and check the Preserve Headers box.


    Enabling this option will preserve any custom headers that are a part of your original mail message. The SMTP relay previously would strip off custom headers before teh email was delivered to the recipient. With this feature, if your email message includes custom headers or headers added on by an email client like:

    X-MSMail-Priority
    User-Agent

    They will be included in the final email sent to the recipient. Additionally, if you have custom headers that help identify an email message in your internal system, such as:

    X-CustomEmailID

    those will also be preserved.

    We will be enabling an option in a future launch such that you can set a particular custom header's value to show in reports, allowing you to tie each individual sent email, open, and click back to your internal system's own identification mechanism.

    Wednesday, January 12, 2011

    Location metrics have been relocated within Reporting

    To improve consistency and avoid confusion in an email campaign's Reporting metrics, Geotracking Location data has been moved to display along with the Raw Data of a Campaign's Details reports. This data had previously been located along the different ways to group data (by Domain, by Sender, by Email Client, etc.), though it did not group by location.

    Now, you will find the location data in the raw data report itself.


    The additional columns showing Geotracking's Country Code, Region, City, Zip Code, ISP, Domain Name, Latitude, and Longitude are on the right.


    More Resources

    For more information on this feature set, visit our previous blog posts:


    You can also read earlier blog posts about Phase I, Phase II, and Phase III of our Geo Tracking deployment. These previous posts show you how to view raw location data on Opens, Clicks, and Page Views, as well as segment your data by distance from a particular zip code.

    Tuesday, January 04, 2011

    New API method to retrieve SMTP log for transactional email

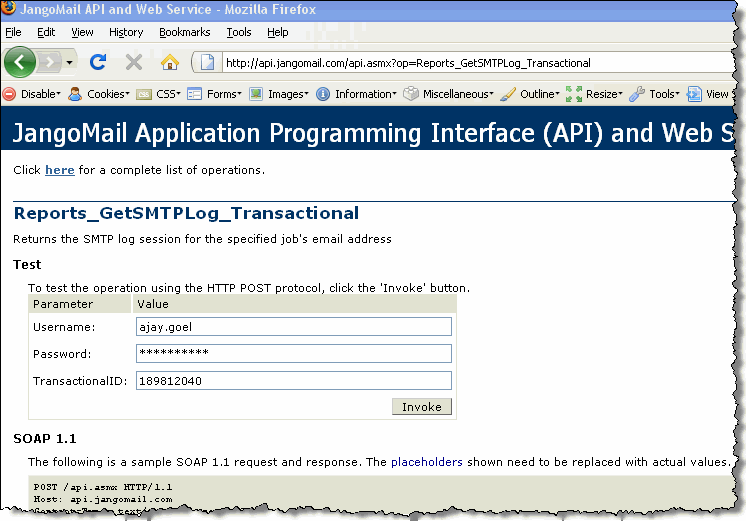
    We've launched a new API method to retrieve the SMTP log for a transactional email message. The method, Reports_GetSMTPLog_Transactional, is described in detail below.


    The method takes, as input parameters, the account username, password, and the numeric Transactional ID corresponding to the transactional email for which the SMTP Log should be retrieved. The method was designed around the Transactional ID rather than a recipient email address, since the Transactional ID will always be unique per individual transactional email message. With email addresses, there can be multiple transactional emails to the same address within an account.

    Thet Transactional ID can be retrieved from the User Interface in Reporting, or via other API methods, like Reports_Transactional_GetRecipients_XML.

    The output of Reports_GetSMTPLog_Transactional includes the SMTP log as an XML string:


    Note: This new method is in addition to our existing method that retrieves SMTP logs for broadcast email messages:


    JangoMail is the only email service that offers access to SMTP logs for both broadcast email campaigns and transactional email, and is now also the only service to do so through an API. The full API, including documentation and test forms, is at http://api.jangomail.com/
  • Reports_GetSMTPLog
    Returns the SMTP log session for the specified broadcast campaign's email address


  • Reports_GetSMTPLog_Transactional
    Returns the SMTP log session for the specified transactional email message
  • Tuesday, December 21, 2010

    An adjustment to how we calculate open rates

    Tonight we've made a slight adjustment to how our system detects an "open" on a broadcast email campaign.

    First, some background

    Email marketing systems detect that an email has been opened by inserting a 1-pixel image at the bottom of the email message and waiting for that image to be downloaded from the server. Some email clients block images by default, and therefore they prevent email marketing systems like JangoMail from detecting the "open". If an email message can be understood by its recipient by not seeing the actual images, because perhaps there is enough text to explain the email message, then it's even more likely that the 1-pixel image won't be downloaded.

    Therefore, we have always only counted an email as being "opened" if the 1-pixel image at the bottom of the email was downloaded, meaning that the recipient had viewed the email, and that images (even if there aren't any in the email body) are turned on.

    New way to detect an open

    We recently determined, however, that in many cases, a recipient may click a URL in an email (thus counting as a click), but never downloads the images in the email (thus NOT counting the open). And since clicking the email is indicative of also opening it, we've made the following change to Open Tracking:

    If an email is clicked, but that recipient has not yet been counted as an "open" for that email campaign because images haven't been downloaded, the recipient now WILL get counted as an "open" anyway due to the click.
    The net effect of this change is that you will now see higher Open Rates, and the Open Rates will be more accurate and reflective of what recipients are actually doing with the email message.

    How much of a difference does this make?

    Our analysis shows that this makes a big difference. For a recent email campaign we did to a segment of our own customers, these were the statistics in Reporting:

    Recipients: 6,369
    Unique Opens: 993 (15.6%)
    Unique Clicks: 384 (6.0%)

    An analysis of the data showed that there were 118 unique recipients that clicked that never registered as having opened the email. So if we add the 118 to 993, that's now a total of 1,111 opens, for an actual open rate of 17.4% instead of 15.6%.

    Thursday, December 09, 2010

    Holiday Email Templates - For Free!

    TemplateZone is offering their Holiday Email Template package for free to any JangoMail client who "Likes" them on Facebook.

    Visit TemplateZone's facebook page and "Like" them now to get your free email templates.

    Monday, December 06, 2010

    New Feature: No need to specify From Addresses when using SMTP server

    If you're using JangoMail to send transactional email, and specifically you're using the SMTP service to send transactional messages, then this post applies to you!

    When using the SMTP service, you no longer need to specify your From Addresses in your JangoSMTP Settings when using SMTP Authentication (SMTP AUTH) to authenticate into relay.jangosmtp.net.

    This is a substantial enhancement to the JangoMail SMTP service. By simply setting your email client to use SMTP AUTH and passing in your JangoMail username and password, the system will be able to assign your emails to your account. This is especially beneficial to organizations that send emails from many different From Addresses through one single JangoMail account.

    As a result, we will soon be taking away the screen within Settings where you would normally specify a list of From Addresses when using SMTP username/password authentication.

    [This screen will soon be removed.]

    Note that this only applies to users using username/password to authenticate into the SMTP server. If you're using IP authentication, then there is no change, as users using IP authentication have always been able to send without specifying From Addresses.

    Tuesday, November 23, 2010

    Technical Notes: Using the JangoMail API with PHP

    Cool Life Systems, a provider of custom business solutions, uses the JangoMail API with PHP to send emails. They have graciously allowed us to share a sample of the PHP code they use to integrate their system with JangoMail's email solution. We hope this is helpful to anyone looking to use the JangoMail API with PHP. Thanks, Cool Life Systems!

    We have two samples available that allow a user to input all of the parameters required by the API in order to send out an email message.

    PHP Sample #1: Send a Mass Email - allows a user to send a mass email to a specified group that is in their account using the SendMassEmail method at http://api.jangomail.com/api.asmx?op=SendMassEmail

    <?php
                        
    $client = new SoapClient('https://api.jangomail.com/api.asmx?WSDL');

    $parameters = array
        (
            'Username'          => (string) 'username',
            'Password'          => (string) 'password',
            'FromEmail'         => (string)
    'fromaddress@domain.com',
            'FromName'          => (string) 'name',
            'ToGroups'          => (string) 'group name',
            'ToGroupFilter'     => (string) '',
            'ToOther'           => (string) '',
            'ToWebDatabase'     => (string) '',
            'Subject'           => (string) 'Mass Subject',
            'MessagePlain'      => (string) 'Mass Plain (plain text)',
            'MessageHTML'       => (string) 'Mass HTML (html) <br><a href="http://
    www.google.com">Link #1</a>',
            'Options'           => (string) 'OpenTrack=True,ClickTrack=True'
        );
       
    try
    {
        $response = $client->SendMassEmail($parameters);
        echo "Message(s) sent!";
    }
    catch(SoapFault $e)
    {
        echo $client->__getLastRequest();
    }

    ?>

    PHP Sample #2: Send a Transactional Email - allows a user to send a transactional email to a recipient that they specify using the SendTransactionalEmail method at http://api.jangomail.com/api.asmx?op=SendTransactionalEmail

    <?php
                   
    $client = new SoapClient('https://api.jangomail.com/api.asmx?WSDL');

    $parameters = array
        (
            'Username'          => (string) 'username',
            'Password'          => (string) 'password',
            'FromEmail'         => (string) 'fromaddress@domain.com',
            'FromName'          => (string) 'name',
            'ToEmailAddress'    => (string) 'recipient@domain.com',
            'Subject'           => (string) 'Transactional Subject',
            'MessagePlain'      => (string) 'Transactional Plain (plain text)',
            'MessageHTML'       => (string) '<b>Transactional HTML</b> (html)',
            'Options'           => (string) 'OpenTrack=True,ClickTrack=True'
        );
       
    try
    {
        $response = $client->SendTransactionalEmail($parameters);
        echo "Message(s) sent!";
    }
    catch(SoapFault $e)
    {
        echo $client->__getLastRequest();
    }

    ?>

    Thursday, November 18, 2010

    How we restored a customer's lost email list

    Sometimes I'm surprised by the creativity of our staff to solve customer problems.

    Today we had a customer (name changed to protect their privacy), Pecan Films, that returned to JangoMail after being inactive for two months and not having sent an email campaign through JangoMail for over a year. When the customer reactivated their account with us, they logged in, only to discover that their main email list was no longer in the account.

    What happened?

    We recently put in a data purge mechanism such that email lists for inactive accounts are deleted if there hasn't been any email sending activity for over a year. The Pecan Films account met this criteria, and so their Email List was deleted from the system in the last two months.

    Unfortunately, this was the only copy of their email list in existence. They had not exported their email list prior to deactivating their JangoMail account.

    Digging for the lost data

    I discussed with our sysadmin, and he mentioned that he had an old copy of the database that stores customer Email Lists on a spare server. The database was from September, which would have been right around the time when the Email List was automatically deleted due to account inactivity. The only problem is that the database that stores customers' email lists identifies a particular email list only by its internal numeric identifier, and not by name or by user account. A separate database actually ties the data in the first database to the user account to which it belongs, and the relevant data was also missing from this database, with no September backup copy on which to rely. So despite having the data somewhere in the huge database of customer Email Lists, we had no way of knowing the numerical identifier by which to find the email addresses.

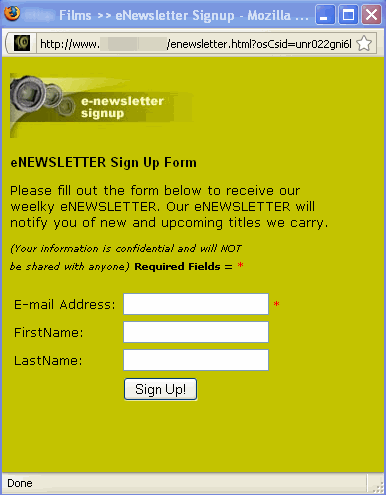
    Then, it dawned up on us that had the customer been using JangoMail's subscriber form generator, their web site may have the missing clue. So I go to www.pecanfilms.com (URL changed for privacy), find their Subscriber Signup Form, and am relieved that it looks like a JangoMail subscriber signup form:


    And by viewing the source, I found this key line of HTML code:

    This is the old version of the FORM ACTION tag for a JangoMail-generated subscriber signup form (the form generator has since been updated). So there was the missing identifier, right in the FORM's ACTION tag. With that in hand, we were able to pinpoint the correct database table, extract the email addresses, and restore them into the customer's account.

    Lessons Learned

    As a customer, you should regularly backup your email list data. We make it easy to do. Just click the Export List Data button:

    If you're using JangoMail to connect in real-time to a database file, then make sure you regularly backup your database using the database's backup tool. All of your database files containing email list data, from Excel Files, to Access Files, to SQL Server databases, should be regularly backed up. With the advent of inexpensive Internet-based backup services like Mozy and Carbonite, it's easy and fast to implement. If you're using JangoMail with a web-based CRM system like Salesforce to send email marketing campaigns, you should use the export functionality built-into the CRM system to keep a local copy of your data handy.

    Wednesday, November 17, 2010

    New Survey Features: Export survey data, filter responses, specify a redirect URL

    We've launched some long-awaited enhancements to our survey platform. You can now:
    1. Export detailed survey response data straight out of Reporting
    2. Filter survey responses by a particular question or answer, and then send follow-up email campaigns or create Email Lists based on filtered recipient data.
    3. Specify a redirect URL where the user is taken after completing a survey
    4. Call the API to retrieve survey responses programatically
    Exporting survey data from Reporting

    Click the survey column for an email campaign to go to the detailed responses data for that campaign.


    Screenshot of detailed survey response data

    Filtering survey data

    You can filter survey response data by question or by response. After filtering the data, you can then send a followup email campaign to just the recipients that match the filter criteria, or create a new Email List based on the filtered data.


    Specifying a redirect URL after survey completion


    When designing a survey, you can specify a redirect URL as shown below:

    After the user is done taking the survey, the user will be redirected to the URL specified rather than the default JangoMail survey-completion page.


    API methods to access survey data

    The new method is available in 3 formats, depending on your desired output format:


    Survey responses must be retrieved by their corresponding email campaign, specifying the numeric Job ID. Additionally, the data can be sorted one of two ways, by recipient email address ("e") or by question ("q").
  • Reports_GetSurveyResponses_Dataset
    Retrieves survey responses for a particular mass email campaign. Returns a Dataset.


  • Reports_GetSurveyResponses_String
    Retrieves survey responses for a particular mass email campaign. Returns a String.


  • Reports_GetSurveyResponses_XML
    Retrieves survey responses for a particular mass email campaign. Returns an XML document.
  • Sunday, November 14, 2010

    New Feature: Google Analytics integration now works with transactional email

    Google Analytics integration is now available with transactional email sent through the SMTP relay or through the API.

    If you're already sending mass emails through JangoMail and using Google Analytics, then you need not change anything for your transactional email to also start working with Google Analytics. The only difference between the way in which mass emails are tracked versus transactional emails, is that the "Subject" becomes the "Transactional Group Name" and the "CampaignID" becomes the "Transactional Group ID".

    For example, if you're using the default Google Analytics settings in your account, as shown below:


    Mass emails with click-tracked links will take the recipient to a URL that looks like this:

    http://www.browniekitchen.com/?utm_source=JangoMail&utm_medium=Email&utm_campaign=Welcome+to+Brownie+Kitchen+(789829313)&utm_content=ajay.goel%gmail.com

    Transactional email with click-tracked links will take the recipient to a URL that looks like this:

    http://www.browniekitchen.com/?utm_source=JangoMail&utm_medium=Email&utm_campaign=Welcome+Group+(22514)&utm_content=ajay.goel%gmail.com

    Notice that the difference is that with transactional email, it's not the Subject of the email that gets recorded in Google Analytics, but the Transactional Group name to which it belongs. This determines what the campaign is named inside your Google Analytics account. For mass emails, it makes intuitive sense that the campaign would be named by the mass email's Subject line. For transactional email, it wouldn't make sense to use each individual email's Subject line, because if you send 1,000 transactional emails, all with different Subject lines, you'll end up with 1,000 different campaigns in your Google Analytics account, and making sense of the data would be impossible. That's why transactional emails will be categorized by their Transactional Group Name and not their Subject.

    You may use any combination of these values in the four Google Analytics variable fields:

    %%EmailAddress%% = the email address of recipient
    %%Subject%% = the subject of the mass email campaign
    %%CustomID%% = a custom identifier chosen by the user for mass email campaigns
    %%CampaignID%% = the JangoMail identifier for a mass email campaign
    %%TransactionalGroupName%% = the Transactional Group Name of a transactional email
    %%TransactionalGroupID%% = the Transactional Group ID of a transactional email


    %%Subject%% and %%CampaignID%% are used for mass emails and %%TransactionalGroupName%% and %%TransactionalGroupID%% are used for transactional email. However, if you are using %%Subject%% and %%CampaignID%%, and you send transactional email, then %%Subject%% will be treated as %%TransactionalGroupName%% and %%CampaignID%% will be treated as %%TransactionalGroupID%%. That means that if you're using your account to send both mass email and transactional email, you can leave the defaults in place for utm_campaign:

    utm_campaign: %%Subject%% (%%CampaignID%%)

    This setting will allow Google Analytics integration to work with both your mass email and transactional email messages.

    More Reading:

    For more information on our Google Analytics integration including screenshots of what your campaigns will look like inside Google Analytics, please download the PDF guide to JangoMail's integration with Google Analytics.

    Friday, October 15, 2010

    New Security Feature: Restrict account access by IP address

    You can now restrict access to your JangoMail email account by IP address. You can specify a range of allowable IP addresses or a single IP address.

    To restrict access by IP address, go to Settings --> Security --> IP Addresses. Simply enter in a single IP address or a range of IP addresses and designate whether the restriction should apply to the web interface, the API, or both.

    In the above screenshot, the IP address range 64.56.108.99-105 can access the web interface for this account, while the single IP 72.45.45.8 is the only IP address that can access the API for this account.

    If there are no IPs entered, as is the default on accounts, then there are NO restrictions on which IP addresses can access your account. As soon as you enter at least one IP range, then that becomes the range from which your account must be accessed.

    If a user attempts to login to the web interface from an unauthorized IP address, then the user will see the following message:


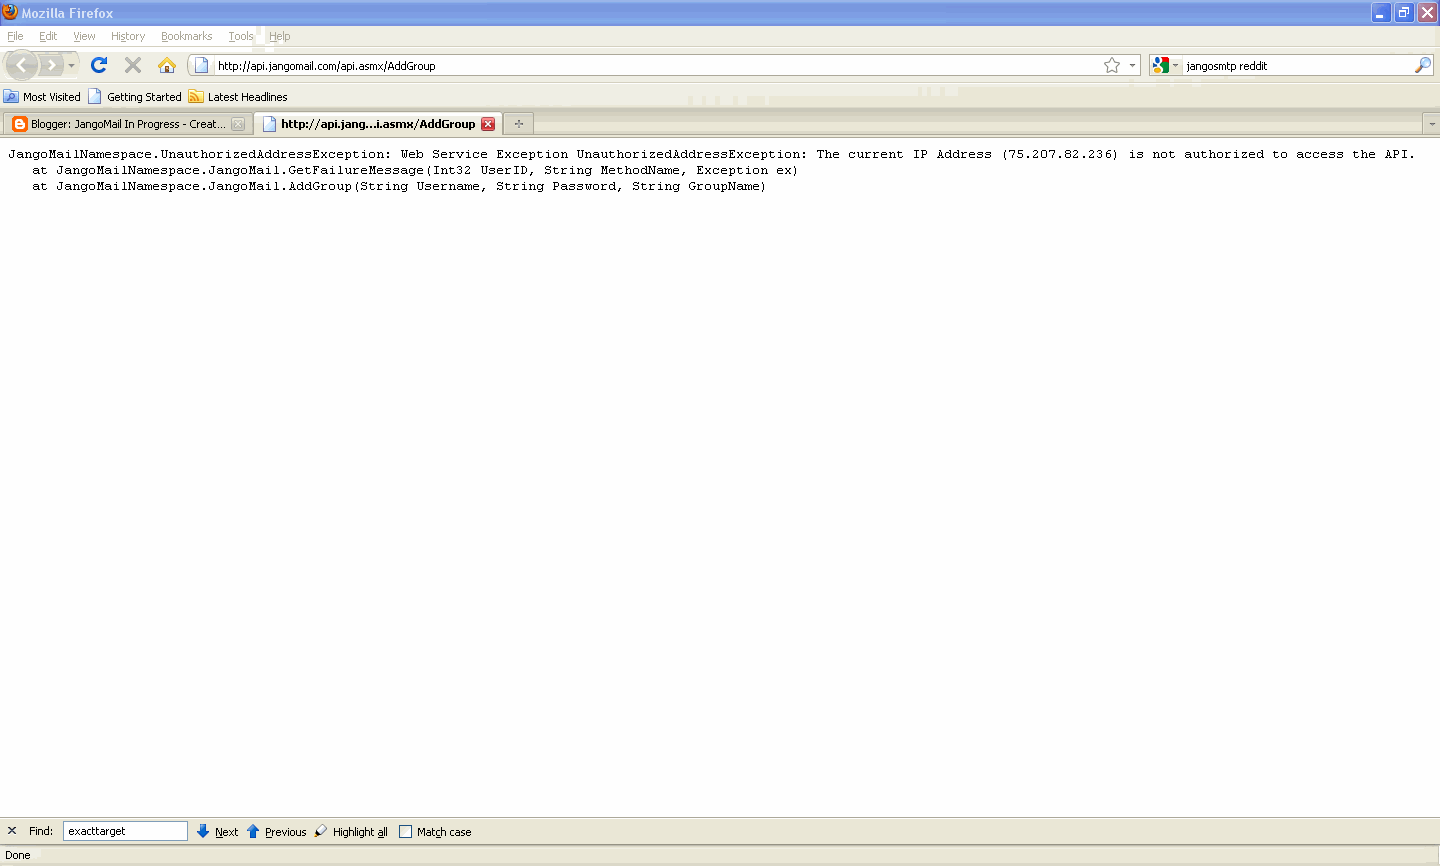
    If the API is called by a node outside of the authorized IP addresses, then an exception will be thrown, as shown below:

    Wednesday, October 13, 2010

    New Feature: Use Our Google Maps Integration to Create and Send to an Email List

    You can now use our Google Maps report to create Follow-Up Email Lists and send Follow-Up Email Campaigns.

    Earlier, we launched a series of new reporting features that allow you to create and send to an Email List from an Open, Click, and Page View report, as well as from an Unsubscribe, Bounce, and Transactional Email report. We have added to this feature set to allow you to send Follow-Up Email Campaigns or create Follow-Up Email Lists from a Google Maps geo targeting report.

    There are two new icons in our Google Maps geo targeting report that allow you to Create and Send to an Email List. Click on the image below to see the two new icons.


    Send more relevant marketing emails quickly and easily with this feature.
    • Notify recipients who are within a geographic area of a new store opening.
    • Send a sports-themed email featuring a team local to the recipients' area. 
    • Create a weather or outdoor-themed email relevant to the recipients' geography.
    How to use a Google Maps Report to Create and Send to an Email List
    1. Go to the REPORTS tab and click on the data point that you would like to use to create an Email List. In this example, we are clicking on a Unique Opens report.
    2. Click on the (map) link next to the Recipients count.
    3. Narrow down your report by using the navigation on the left side of the report, or by clicking on areas in the map and clicking Select.
    4. Once you narrow down your report, you will see a list of recipients below the Google Maps geo targeting report. Click on the Create Email List Icon or the Send to Email List Icon to turn this report into an Email List or to send directly to the email addresses in the report.

    More Resources

    For more information on this feature set, visit our previous blog posts:


    Wednesday, September 29, 2010

    New Reporting Features: Click anywhere, filter instantly

    We have launched a major reporting enhancement that makes it much easier to segment reporting data and send on-the-fly email marketing broadcasts to segmented data with one single click.

    The instant segmentation applies to data in these reports:
    • Mass Email Opens
    • Mass Email Clicks
    • Mass Email Web Site Activity Tracking
    • Mass Email Unsubscribes
    • Mass Email Bounces
    • Transactional Email Opens
    • Transactional Email Clicks
    • Transactional Email Unsubscribes
    • Transactional Email Bounces
    • All Bounces
    • All Unsubscribes
    Clicking almost any data point in one of these reports will result in an instant filter being created. The filtered data can then be used to send a new email campaign right away, or to create a new Email List.

    Example 1, Filtering Click Tracking

    For example, in our customer Popcorn Palace's account, here is a recent click tracking report:

    After clicking on a URL in the click-tracking report, the filter is created, and a new report is generated:


    Example 2, Filtering Web Site Analytics

    In this example, we'll create an instant filter on the Web Site Activity Tracking report, a report that tracks a user's movement through your web site after clicking a link in an email campaign. In this example, we're going to use our own JangoMail account -- the one we use to email our own customers and prospects.

    From the main Reports screen, click the number under "Page Views".

    This gives you a list of all recipients and the web pages on your site that they visited. To filter down to just the recipients that created a Free Trial Account, or landed on https://www.jangomail.com/FreeTrial-Action.asp, click the URL anywhere in the report.

    More Resources

    For more information on the two new icons, Send new campaign, and Create Email List, available throughout Reports, see this blog post.

    You can also filter an Email List directly from within the Email Lists tab. For more information, see the tutorial Advanced Filtering of List Members.

    Tuesday, September 28, 2010

    Why eNannySource came back to JangoMail

    eNannySource is a former email marketing client who recently came back to us because of JangoMail's technological advantages. We got a chance to catch up with Steve from eNannySource to learn more about his decision to return to JangoMail.
     
    JM: Steve, we are excited to have you back. Could you tell us a little about eNannySource and how you use JangoMail?
     
    Steve: Yes, eNannySource has been around since 2001. It's a 100% online business that matches nannies with families. We have a database of families and nannies and they use our service to find each other.
     
    I have a series of emails that go out to new members on a daily basis. They tell families various things to look for when they hire a nanny. I also send out periodic seasonal email newsletters to past members. For example, I just sent a blast out to families for back-to-school time. Fall is here and there's a big scramble to hire part-time nannies.
     
    JM: So what was most important in your decision to come back to JangoMail?
     
    Steve: Most important for me regarding JangoMail is that it has direct database connectivity, so it's really, really easy to integrate with my back end.  The email newsletters I send out are triggered by database events, so it takes the developers no time at all to set these things up. Also, when I want to send out an email myself, I'm not a programmer, but if I have a template, I can modify the code to change dates, etc. myself.
     
    JM: So the major advantage that JangoMail brings you is the ability to immediately send emails?
     
    Steve: Yes, I have to do absolutely nothing. The company that I used to use and the others out there are designed for either companies that have very small lists or static lists. So if you have a church or synagogue website and you want to do a weekly mailing, the list doesn't change much from one week to the next. My list is constantly changing. My whole system is based on events that happen in the database on a daily basis. With the company I was using, it took my developers forever to integrate. We had numerous calls with their developers and ultimately there were so many restrictions on things that we wanted to do that were never restricted in JangoMail.
     
    On balance, you guys are head and shoulders above the rest. You really are. I haven't told my developers yet. They will love it. For a brief example, it took weeks of going back and forth with my developers and the email provider's developers just to set up the API interface to send out an email to a new member. There was also no way to deactivate emails when a customer deactivated their account. The emails kept going out due to the lack of direct database connectivity.
     
    JM: So if someone was to unsubscribe or bounce, they would not automatically be taken off the list?
     
    Steve: If they unsubscribed through the email service, then yes, they would be taken off the list. But, if they terminated their membership on our side, the customer would not automatically be unsubscribed.
     
    JM: Can you tell me more about what features you use the most and find the most valuable?
     
    Steve: What we use the most is the part I never even saw: the database connectivity. JangoMail seamlessly integrates with us. I can just tell my developer to send this email based on this event for this number of days to these particular members and it was done without having to connect with other developers.
     
    Also, if I wanted to go in and send an email I could learn how to use it in a jiffy. It's really easy. I spent days trying to figure out how to use the other email system. They have no way to import and reuse templates. The templates basically have to be designed by the company. Either you as a user have to do some serious HTML modification or the developer has to go in and do an email send. I shouldn't have to get my developers to go in just to send an email.
     
    I like your reporting. The way my other company displayed the information in reporting was in such an unusable format that I was constantly having to export it into Excel and then manipulate it so that I could use it. I didn't realize how good Jango's reporting was until I went to this other company.
     
    JM: Steve, we are excited to have you back. It's always great when someone returns to us.
     
    Steve: I'm glad you appreciate it. You guys will have me back for a while.

    You now get more bandwidth, for free!

    JangoMail users sending mass emails with large attachments or otherwise bulky HTML content now get a higher bandwidth allotment, for free. Historically, we've only allowed 20 KB per email message you send before you were hit with bandwidth overage fees. We have now bumped that to 100 KB per email message.

    For example, if you're on our 12,000 emails/month plan:

    Before - you could send up to 12,000 emails and 240 MB of data
    Now - you can send up to 12,000 emails, and 1.2 GB of data

    This change will lower many users' monthly bill and will allow more flexibility in HTML design options and file attachment options.

    All new accounts get the higher bandwidth allotment upon account creation.

    All existing accounts will see the higher bandwidth allotment on their next monthly renewal.

    Monday, September 27, 2010

    New SMTP relay service feature: Authenticate a Class C IP block

    Our customers using the SMTP relay can now add a full class C IP block to their list of authenticated IP addresses, instead of adding single IPs at a time. To add a class C block of IP addresses (255 IP addresses), contact our support team, and they can do this for you, as the feature is not yet available through our web interface.

    Why would I need to allow 255 IP addresses to relay email?

    Most customers will not need to do this, but we have some customers that are ISPs, web hosting companies, and cloud computing services. These organizations often need to allow larger blocks of IP addresses in order to serve their own customers.