Monday, May 03, 2010

Changes to web database connection settings

We made a change this weekend that affects all users that had set web database settings under Settings --> Web Site / DB Settings.

[This screen should no longer be used.]

Settings on this page were applicable when any of the following operations were executed:
  1. Synchronization of unsubscribes, bounces, opens, clicks, forwards with a web site database
  2. A call to the SendMassEmail or SendMassEmailPrevious2 API methods, while passing in a SQL query to the ToWebDatabase parameter.
Thus the settings were applicable for web database operations that occurred outside the normal JangoMail web interface (offline operations).

We have now replaced these settings with the ability to declare an existing Web Database Connection Profile as the Master Web Database Connection Profile. The profile chosen as the Master Profile will be the profile whose connection information will be used for the aforementioned "offline" operations.

[The "Master Profile" page should be used instead.]

If you had settings on this page, then a new web database profile has been created for you called Default Master Profile. This profile copies the settings from this page, and is already set as your default profile.


Only one web database connection profile can be declared as the Master Profile:


Web Database Connection Profiles can be created under Connect to My Database --> Connect to Internet Web Site Database. Once the profile has been created, it can be set to be the Master Profile under Settings --> Web Site Database --> Master Profile.

Note: If you are using a custom web database integration, it is important to correctly set the Variable Name that is the SQL Statement when you create your master profile. It is this variable that is substituted with the correct SQL statement when either of the two offline operations mentioned above are encountered.


For now, we have left the page "Web Site / DB Settings" in place, but we'll soon be removing this page from the interface completely.

Saturday, May 01, 2010

This blog has moved


This blog is now located at http://blog.jangomail.com/.
You will be automatically redirected in 30 seconds, or you may click here.

For feed subscribers, please update your feed subscriptions to
http://blog.jangomail.com/feeds/posts/default.

Tuesday, April 27, 2010

New Feature: Reset statistics for a Transactional Email Group

You now have the option to reset the statistics for any Transactional Group to all zeroes. This won't delete any of the data behind the statistics, but will just start counting all unsubscribes, bounces, opens, clicks, and complaints from zero again. So, you can still see all of the email address that unsubscribed, bounced, opened, clicked, and complained historically.


Why would you want to reset your statistics?

There are many reasons, but the most common one is if you're sending test emails as part of a Transactional Group, and you're ready to stop sending and start sending for real. You may not want the counts from the test emails counted in your official Transactional Group statistics.

Thursday, April 22, 2010

How to use the ASP.Net script file to integrate your web database with JangoMail

If your organization's web site and database platform is ASP.Net and SQL Server, JangoMail provides a file (w_5.aspx) which you may place on your web server, which allows JangoMail to pull email list data in real-time from your database, as well as update your database with recipient actions, like unsubscribes, bounces, opens, and clicks.

The steps are:
  1. Go to the Lists section and click on the Databases tab.
  2. Click Add New Item.
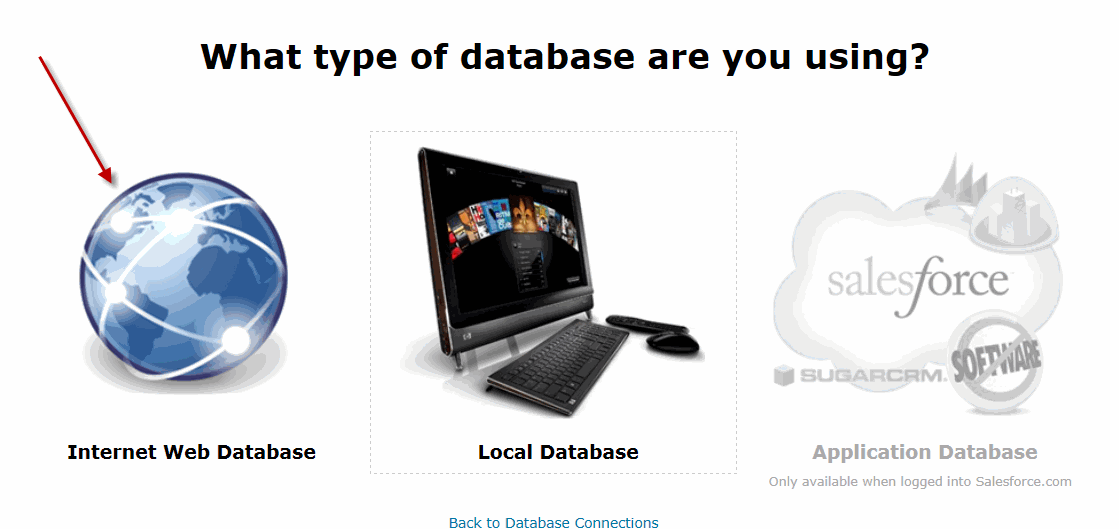
  3. Choose Internet Web Database and then choose the ASP.Net option.

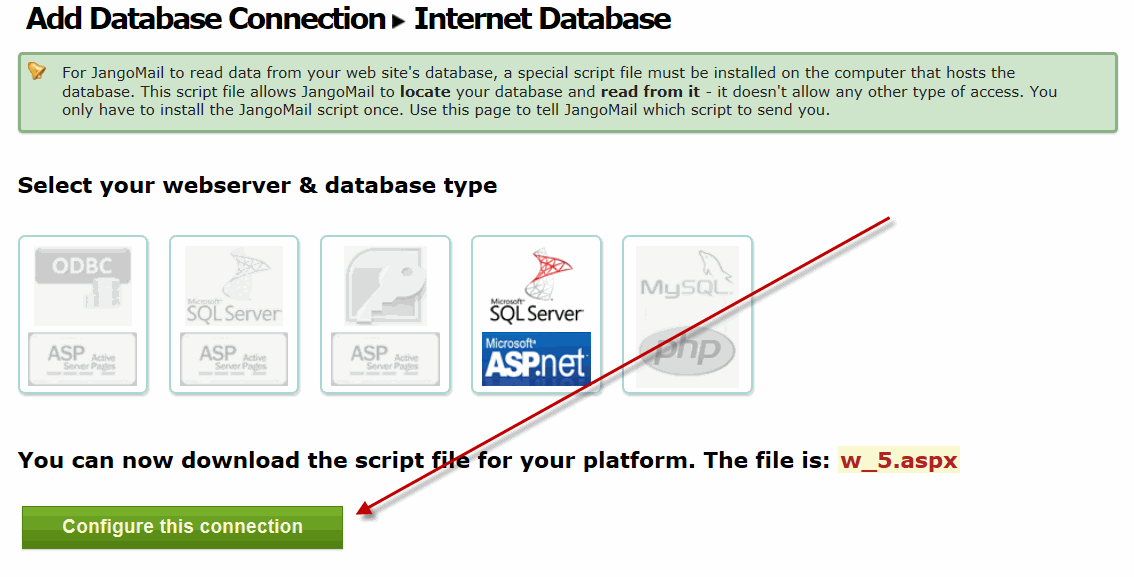
  4. Retrieve the w_5.aspx file and place on your web server.

  5. Once you have the w_5.aspx file uploaded to your server, click Configure this connection.
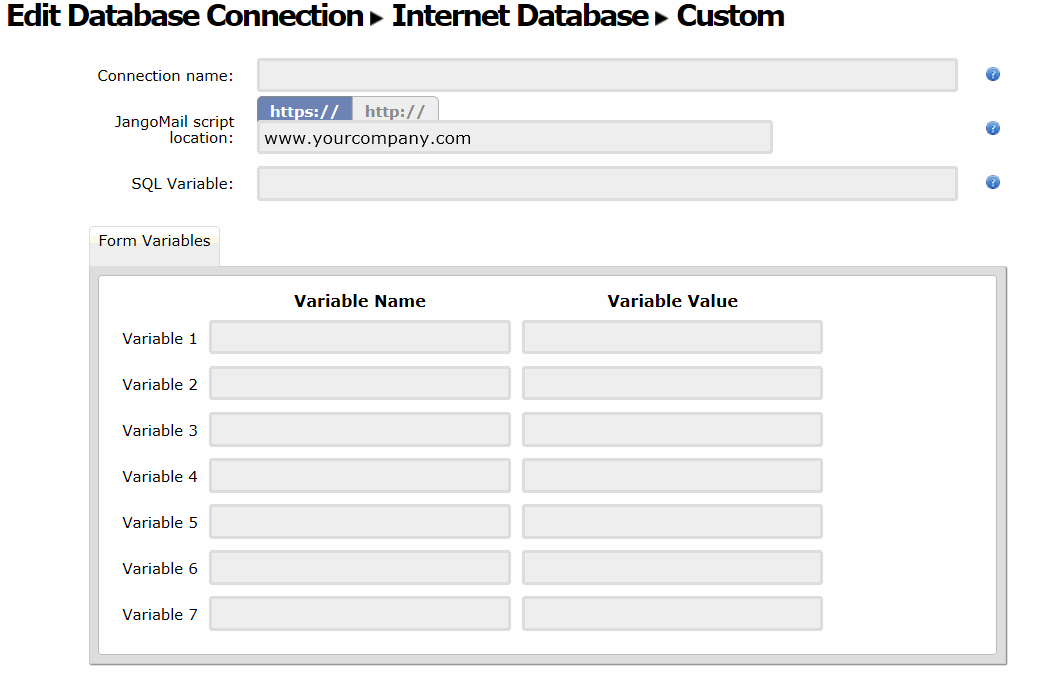
  6. Fill in the variable names and values, including the SQL query to retrieve your email list data.

  7. Save the profile, and then click the Connect icon next to the profile name.

You may alter the w_5.aspx file as you see fit. For example, if your web site connects to SQL Server via ODBC instead of the default ASP.Net method, then you may modify the connection string in the w_5.aspx file.

Want to use this feature from the API?

Find out how in this blog post.

Further Reading

Detailed PDF Guide on Connecting to Internet Web Site Databases
Writing your own custom script file for any platform

Wednesday, April 21, 2010

How to write a custom web server script for JangoMail integration

JangoMail was one of the first and is one of the only email marketing service providers that can connect to a customer's web site database in real-time. Historically, we've supported and provided web server script files for 4 different scenarios:

Active Server Pages / ODBC Database -- w_1.asp
Active Server Pages / Microsoft SQL Server -- w_2.asp
Active Server Page / Microsoft Access -- w_3.asp
PHP / MySQL -- w_4.php

Recently, we added a fifth option:

ASP.Net page / Microsoft SQL Server - w_5.aspx

All five of these platforms and the five corresponding files are provided to you by JangoMail.

Still, many customers have web/database server that don't fit into one of these canned scenarios. Now, you have the ability to write your own web server script file, based on whatever platform you're running.

First, let's look at the screen in JangoMail where you plug in variable names and values that will be passed into your custom web server script.


Go to Lists --> Databases --> Add New Item


Select Internet Web Database and then ASP.net. 


Download the script file provided and upload it to your platform.
Then click Configure this connection.


Here you will enter your variable names and values.

There are seven variable names and values you may specify. You need not use all seven. For each variable name/value that you specify, your web server script file must be written to accept each variable as a FORM POST. The variable and its corresponding value will be passed to your script file. Note that the variable "action" will be passed always with the value "massmail". This informs your script file that the purpose of this call is to generate a set of data for a mass emailing (as opposed to a synchronization call which we'll cover later).

Once you've programmed your script to accept the variables and values via FORM POST, you must next program your script to generate data based on these variables. Example variables may be:

DatabaseName
DatabaseLogin
DatabasePassword
SQL

Based on your web/database platform, these four variables may be sufficient for your script to connect to your database and generate a set of email addresses and other corresponding data.

Regardless of the input parameters that your script takes, the script must generate your email list data in the following format:

FieldName1,FieldName2,FieldName3___ASDF---BREAKValue1WG0COLWG0Value2WG0COLWG0Value3WG0ROWWG0ValueAWG0COLWG0ValueBWG0COLWG0ValueCWG0ROWWG0WANGO-ENDOFDATASTREAM

Let's break this down and look at it more closely. The output the script should generate is:

1. The field names, separated by a comma.
2. Next, is a standard separator used by JangoMail to separate the field names from the field values: "___ASDF---BREAK"
3. Next comes the actual data, using a column separator of "WG0COLWG0" and a row separator of WG0ROWWG0 (and add an extra row delimiter at the end, before the "end of data stream" line).
4. Finally, at the end of the data string, end with "WANGO-ENDOFDATASTREAM"

For example, assuming you're passing in the correct parameters to connect to your database, and your SQL is:

select FirstName, LastName, EmailAddress from Users

and it returns two records, the output of the script should look like:

FirstName,LastName,EmailAddress___ASDF---BREAKJohnWG0COLWG0SmithWG0COLWG0johnsmith@yahoo.comWG0ROWWG0NateWG0COLWG0LakemanWG0COLWG0nlakeman@gmail.comWG0ROWWG0WANGO-ENDOFDATASTREAM

Therefore, using the example above with the four input variables, the screen would be filled in as follows:


This example assumes that I have called my script file JangoScript.do and that I've placed it in the root directory of www.browniekitchen.com. It also assumes that JangoScript.do is programmed to accept the five POST variables: action, DatabaseName, DatabaseLogin, DatabasePassword, SQL.


When you connect to that profile, JangoMail will connect to your JangoScript.do file, the script will output the data for the two records, and take you to this screen, where you can select your campaign to send to the two recipients:


Frequently Asked Questions
1. Do I have to pass in variables to my script file, or can I hard-code the values directly into my script file?

No, you don't have to pass in any variables to the script file, and you may hard-code them within the script file. The disadvantage to doing so are that a. This allows anyone that knows the script file exists to access it and have it output your email list data and b. It prevents JangoMail from synchronizing your database with unsubscribes, bounces, and other recipient actions, since the SQL query will be hard-coded within your script file, and the SQL query will be the query to retrieve email list data, not update it. A better solution may be to do a hybrid between the integration scenario presented above and hard-coding. For example, the database credentials could be hard-coded into the script file, while only the SQL query and a special password that is validated within the logic of the page is passed to the file by JangoMail.

2. Is this method of connecting to my data secure?

Yes. It is inherently secure if you opt to have JangoMail connect over https instead of http. It can be additionally secured by restricting the range of IP addresses allowed to connect to the custom script file. JangoMail's range of IP addresses are: 209.173.141.193 - 209.173.141.255

3. What is the purpose of the "action" variable name that is forced?

The action variable set to "massmail" tells the script file that this call is specifically to retrieve email list data for a mass emailing, as opposed to other possible actions, like those that synchronize the data with unsubscribe and bounce data.

4. Why does JangoMail need to know which of my variables represents the SQL string?

If you're only using the Web Database Connect feature to retrieve email list data via the web interface only (not the API), you can ignore this setting. This setting is only relevant if you wish to do one of the following:

a. Call the SendMassEmail API method and specify a SQL query in the ToWebDatabase input parameter.
b. Use any of the data synchronization options, like syncing unsubscribe and bounce data back to your database.

In both of these cases, a Master Web Database Profile must be set under Settings. And then, when JangoMail calls the SQL for either scenario a or b, the SQL for the scenario will be passed as the value of the variable rather than the value in the actual web database profile.

5. Where can I read more about this feature?

The following PDF was written when the Web Database Connectivity feature was first made available, and when it was only available on the first four platforms:

https://www.jangomail.com/documents/Public/JangoMail_Tutorial_Web_Database.pdf

Three Bug Fixes to SMTP Service

We've deployed three bug fixes to JangoMail's SMTP Server, relay.jangosmtp.net. These three bugs were detected by customers relaying emails with eccentric attributes through the SMTP server.

1. Emails containing MIME boundaries with parentheses will now be properly handled.

Previously, emails with parentheses in the MIME boundaries, such as a boundary like:

Content-Type: multipart/mixed; boundary="nqp=nb64=()BDXjw0yWx"

would cause the JangoSMTP parser to throw an error. This is now fixed.

2. Emails containing unrecognized Content-Transfer-Encoding types will now default to "7bit".

Previously, if an email message contained an unrecognized or misspelled encoding type, like:

Content-Transfer-Encoding: 7 bit

would cause the JangoSMTP parser to throw an error. This is now fixed.

3. Emails containing foreign characters encoded as ISO-8859-1 will be properly handled.

Previously, an email containing certain foreign characters would have those characters replaced with ? marks or garbled when passed through the relay. For example, a Subject like:

Subject: Confirmation d'Inscription à la Liste de Diffusion - Liste TEST ML

would not have its foreign characters preserved. This is now fixed.

Monday, April 19, 2010

New Feature: FTP your HTML email templates to your account

You can now FTP HTML email template files to client.jangomail.com, and then choose from these templates to compose an email campaign.

FTP to an email template file, such as a .htm or a .html file to client.jangomail.com/HTMLTemplates. Login to client.jangomail.com using your JangoMail username and password.

Command Line FTP Example

The above screenshot shows a command line FTP example of connecting to client.jangomail.com and uploading an HTML template file called BrownieMemorialDay.html.

You may use a friendlier FTP application like FileZilla or even Internet Explorer.

Once you have FTPd a template file, that file will show up after you click the +New Message button in the Messages section. Choose with an Uploaded Template to find your template.


What else can you do with FTP?


You can control several aspects of your JangoMail account via FTP. FTP to client.jangomail.com to:
  1. Upload images and other email content to client.jangomail.com/Images
  2. Upload file attachments that you wish to mass email to your recipients, to client.jangomail.com/Attachments.
  3. Upload email list files to client.jangomail.com/GroupImportsAutoFTP, and JangoMail will automatically turn your file into an Email List to which you can send an email campaign.

Saturday, March 27, 2010

SMTP Relay Server Enhancements

We've deployed a couple of enhancements and bug fixes to the SMTP service.

  1. MIME encoded Subject lines containing a Transactional Group are now handled properly.

    According to the SMTP MIME specification, certain email headers can be MIME encoded. It's called the encoded-word syntax. For example, the Subject of an email might actually look like:

    Subject: =?utf-8?Q?Savings_For_Today{Daily_Alert}?=

    This represents a subject that is character-encoded as UTF-8 and content-transfer-encoded as quoted-printable. This Subject, properly rendered by an email client would look like:

    Subject: Savings for Today{Daily Alert}

    For the purposes of the JangoMail SMTP Server, the subject can contain the Transactional Group that the message should be assigned to in curly brackets. So if this message was relayed through relay.jangosmtp.net, then the actual Subject would be "Savings for Today", and this message would be assigned to the Transactional Group "Daily Alert" in the user's account. Previously, our system was not decoding the Subject properly in order to determine the correct Transactional Group name to which to assign the email, but that has now been corrected in today's release.

  2. If the Sender header is specified in the original email, that header is now preserved.

    The Sender header, similar to the From header of an email, can be used to denote additional information about where the email originated. Most email messages do not contain a Sender header, but in some cases, a Sender header is inserted by an email system if the user is using a From Address not local to that particular email system. For example, GMail users who send "from" an address other than their gmail.com address will have a Sender header inserted into the email where the Sender header equals the gmail.com address and the From address equals the user's chosen From Address.

    On the receiving side, some email clients will show the Sender header as a phrase to the email recipient, saying "From [From Address] On Behalf Of [Sender Address]"

    Previously, if an email was relayed through the relay server that included a Sender header, the Sender header would be discarded by our system and not included in the final email message. Now, the system is preserving the Sender header.

Why you can't connect to the SMTP relay server

We often get inquiries from customers telling us that they're unable to relay emails through relay.jangosmtp.net. Here is a list of the most common reasons why it doesn't work.
  1. Your Internet Service Provider (ISP) is blocking access to external email servers. By default, the SMTP server listens on port 25, and many ISPs block connections on port 25 in order to prevent you from emailing through an external email server. For this reason, our SMTP server also listens on port 2525. You can test connectivity from a Command Prompt by typing:

    telnet relay.jangosmtp.net 25


    Successfully connecting to relay.jangosmtp.net


    If that doesn't work, try:

    telnet relay.jangosmtp.net 2525

    You should get a response from the server as shown in the screenshot above.

  2. You haven't setup a proper authentication method. In order to relay emails through relay.jangosmtp.net, you must login to your account, go to Settings --> SMTP Relay, and authenticate either by IP Address or SMTP Username/Password.
  3. You are connecting to the wrong server. We've had customers attempt to connect to relay.jangosmtp.com, relay.jangomail.com, and relay.jangomail.net, all of which are incorrect. The correct server is relay.jangosmtp.net.
  4. You are manually inputting SMTP commands in order to complete a SMTP transaction. Unfortunately, unless you manually input the data for a proper and well-formed email message, including a Subject and a Message, our system will discard it.
How do you know if your email goes through the relay server properly? You will see your email almost instantly in Reporting after you send it.

Tuesday, March 23, 2010

New Feature: Floating Buttons on Send Email page

We're always striving to improve our user interface, and today we've added an option that will make using the Send Email page much easier. This page has a lot of form fields on it, and every time you make a change to a field, if you want to send yourself a test email, you have to then scroll up or down to find the buttons. Not any more...now you can choose to have the buttons float at the bottom of your screen.

To set this option, go to Settings --> Send Email Page, and check the box to enable Floating Buttons.


The buttons on the Send Email page will now remain constant at the bottom of your page.


Please note that this feature will not work with Internet Explorer 6. It will work with Internet Explorer 7 and greater, and with Firefox, Safari, and Chrome.

Press Release: JangoMail Takes Lead in Delivering Runner Updates During NYC Half-Marathon

New York Road Runners again chose JangoMail to deliver race updates for last Sunday's Half-Marathon.

Read our press release to learn more about how JangoMail helped NYRR deliver race updates via email.

https://www.jangomail.com/JangoMail-Takes-Lead-In-Delivering-Race-Updates-For-NYC-Marathon.asp

Sunday, March 21, 2010

New Feature: Self Service Upgrades!

We've just launched a tool to allow you to upgrade your account without contacting Support. This feature is available only in our new no-frames interface. And we've only rolled it out to a portion of our accounts, to test it out. If you don't see the Upgrade Account button in your account yet, you soon will.


To upgrade your account click the Account Info link in the blue top area, and then you'll see the screen above. Then click the Upgrade Account button.


You'll then be taken to the Upgrade Account tool. From here you have several options:

  1. Upgrade the number of emails for just the current billing cycle.
  2. Upgrade the number of emails for both the current billing cycle and all future billing cycles (a permanent upgrade)
  3. Upgrade the number of data bytes for just the current billing cycle.
  4. Upgrade the number of data bytes permanently, for the current and all future billing cycles.

Friday, March 19, 2010

New API method to retrieve SMTP log files

Several years ago, we were the first email service provider to provide access to SMTP logs for email marketing campaigns. Now we're the first to provide access to SMTP logs via an API. Today we have launched the method Reports_GetSMTPLog to retrieve the SMTP log for a given email address for a given email campaign. Just pass in the campaign ID and the recipient email address.

  • Reports_GetSMTPLog
    Returns the SMTP log for a specified recipient of a specified email campaign

  • This method only retrieves SMTP logs for broadcast email marketing campaigns. We are working on a method to retrieve SMTP logs for transactional email messages as well, but this poses some challenges not seen with broadcast campaigns. For example, while broadcast campaigns generally don't have duplicate email addresses, it is very possible that in a Transactional Group's email messages, a single email address has received multiple transactional messages over time. Thus, simply passing in a Transactional Group Name and an email address won't suffice for retrieving the log, since the API needs to be able to determine the time range of logs to search in order to display them to the caller.

    Thursday, March 18, 2010

    Two new API methods to change Group names

    We have deployed two new API methods. Groups_Rename allows you to change the name of an Email Group (aka Email List). And TransactionalGroups_Rename allows you to change the name of a Transactional Email Group.

  • Groups_Rename
    Renames a group. Returns a String.

  • TransactionalGroups_Rename
    Renames a transactional group. Returns a String.

  • Both of these methods were the request of a client.

    Thursday, February 25, 2010

    Five new API methods

    We've added the following five API/web service methods to improve our transactional email capabilities. All were requested by prospects evaluating JangoMail. Do you have a request for an API method that would make your developer's life easier? Let us know by filling out our Support form.

    Click each method name to use its corresponding test form.

  • GetTransactionalGroupID
    Gets a transactional group id. Returns a string.

  • DeleteTransactionalGroup
    Deletes a transactional group from account. Returns a string.

  • Reports_GetBouncesByTransactionalGroup_DataSet
    Retrieves list of bounced addresses for a particular transactional group. Includes SMTP Diagnostic Code and Definitive columns. Returns a .NET DataSet.

  • Reports_GetBouncesByTransactionalGroup_String
    Retrieves list of bounced addresses for a particular transactional group. Includes SMTP Diagnostic Code and Definitive columns. Returns a string.

  • Reports_GetBouncesByTransactionalGroup_XML
    Retrieves list of bounced addresses for a particular transactional group. Includes SMTP Diagnostic Code and Definitive columns. Returns an XML document.
  • Wednesday, February 24, 2010

    New Report: Complaint Rate Dashboard

    JangoMail and JangoSMTP users have always been able to see the complaint rate for an individual broadcast campaign or for an individual transactional email group. However, it was difficult to see complaint rate history over time, and in aggregate across different types of email campaigns (transactional, autoresponders, recurring campaigns, single-shot broadcast campaigns).

    With our new Complaint Rate Dashboard, available only in our new no-frames interface, you can see your overall complaint rate based on all emails sent from your account in aggregate.

    To access the Complaint Rate Dashboard, make sure your account is using our new no-frames interface, then click Reports, then choose "Complaint Rate History" from the Account dropdown menu:


    Here's an example of the Complaint Rate Dashboard from our customer, Popcorn Palace:


    The report shows the complaint rate for the last 7 days and the last 30 days, and it also allows you to see how many total emails you've sent per day during this period.

    Additionally, you can see what ISP has resulted in the most complaints during a given period.

    Time-based complaint rates are more difficult to calculate than the complaint rate on say, an individual broadcast email campaign. There are two ways to calculate time-based complaint rates:

    1. Bad way: Number of emails sent within a time period and number of complaints received within that same time period. This method is flawed, since the complaint on an email sent within time period A may not be received until after time period A. So a simple division of the complaints received within a particular 7 day period divided by the number of emails sent within that 7 day period would result in an erroneous complaint rate.

    2. Good way: Instead, we tie each complaint back to the original email that resulted in it. The complaint rates shown in this new report are calculated by analyzing how many emails were sent in a given time period, and then analyzing how many complaints were received for only the emails sent within that given time period.

    Tuesday, February 23, 2010

    Your Company Logo in your JangoMail Surveys

    JangoMail now has support for adding your company logo to surveys that you create through our website using the Surveys tab. Adding your logo to your surveys is a great idea, not only because it makes it clear who is conducting the survey, but it also builds on your branding by putting your image in front of your survey participants once more.

    Adding your logo is accomplished in three simple steps:


    1. While logged in, click on the Company Logo selection on the Settings tab
    2. Input the URL of your company logo from your website (or wherever your logo image is hosted)
    3. Click the Update Company Logo button

    After your company logo setting has been updated, that logo will automatically appear at the top of any survey pages you create in the Surveys section of JangoMail.

    Below is a screenshot with a sample survey put together to demonstrate the new feature.


    Wednesday, February 10, 2010

    V-Day Email Tips to Enflame Customer Passions

    Nothing inflames the passions like a well-written love letter. That's why for this Valentine's Day I thought I'd offer some tips on how you can take the same basic tenets of love letter writing to create email campaigns that will really get your customer and prospect hearts beating!

    1. The sheer appearance of a love letter says so much about the sender and the level of his or her affection. As an email marketer, you need to choose layouts, colors, fonts, and graphics that not only accurately reflect your brand but also draw readers in and show you truly care about how they perceive you.

    2. All Romeos and Juliets know how to create the right ambiance. Be sure to consider not only the mood you’re hoping your email will leave readers in, but also the mood they may already be in. Most recipients will be busy, so be considerate of their time and say what needs to be said in order for them to warm up to you.

    3. Ever get a love letter and then gush about it with friends? Your friends are probably left wishing their special someones could melt their hearts like that! Know what your competitors are telling customers, and then beat their sweet nothings with sweet somethings that make customers feel special. Segment your outreach and create copy that focuses on your reader's specific needs. Coupons, giveaways, newsletters and funny videos all show you’re interested in a giving, long-term relationship while contributing to the viral effect.

    4. "Let us go then you and I…" Just like the Love Song of J. Alfred Prufrock, your email must contain a clear call to action. But don’t just ask would-be customers to click on a link or buy your product. Show them how by doing so you can change their lives in deep and meaningful ways.

    5. No matter how eloquently written, sending unsolicited love letters can get you into trouble. As always, be sure your recipients have opted in to receiving your affections!

    JangoMail is also showing some love this Valentine's Day by offering free trials of its powerful email marketing platform and waiving its start-up fee through the end of February. JangoMail offers a variety of affordable pricing options, so anyone can send emails in a highly reliable and personalized way. Visit http://www.jangomail.com/ for more.

    Tuesday, February 09, 2010

    Two New Reports in our New User Interface

    Those users that have switched to our new no-frames interface now have a new report to enjoy -- two new detailed Sending Progress reports. The first shows how many emails are still pending, and which JangoMail sending server they have been assigned to, and the second shows how many emails have been sent per hour since the email campaign was launched.

    To access these two new reports, you must be using the new interface. If you are on the old interface, click "Switch to No Frames" in the top blue area.

    Go to Reports click the (sending) link next to an in-progress email campaign:

    After clicking (sending), a popup will show you how many emails have been sent, how many are remaining, and to which sending server they've been assigned:


    Clicking on [Time] will reveal how many emails have been sent per hour since the email campaign was launched.

    Saturday, February 06, 2010

    Two bug fixes in SMTP relay service

    We've just deployed two fixes to the JangoSMTP transactional email service:

    1. Previously, lines in an email message that begin with a single period would result in two periods when delivered to the recipient. This was a bug related to how SMTP treats the escaping of periods. This is now fixed. To read more about issues involving SMTP and periods, see this article: http://db.ilug-bom.org.in/lug-authors/philip/docs/mail-stuff/smtp-intro.html

    2. Previously, if an email message was relayed to relay.jangosmtp.net and included both the Disposition-Notification-To and the Return-Receipt-To headers, then JangoSMTP would throw an error on the email message:

    System.ArgumentException: An item with the same key has already been added.

    This is now fixed, and email messages containing both headers will be delivered properly.

    Monday, January 18, 2010

    JangoMail Has Upgraded Its HTML Editor

    It has been a while since the last upgrade but JangoMail has just installed the latest version of the Ephox EditLive! HTML editor. What does this mean for you? TONS of new features and bugfixes, including:

    • Support for setting the language direction in both the applet and in inline editing sections
    • Improved dictionaries for spell checking
    • Additional support for international, non-English locales
    • Fixes for several table rendering problems


    See here for a list of all bugfixes and enhancements.

    Friday, January 01, 2010

    Transactional emails now support List-Unsubscribe header option

    Back in July, we announced support for the List-Unsubscribe header in broadcast email campaigns sent via JangoMail.

    Starting today, the List-Unsubscribe header will also be applied to transactional email messages. Transactional emails are email messages sent via any of the following methods:
    1. The SMTP relay service
    2. Any of the following API methods: SendTransactionalEmail, SendTransactionalEmailFromTemplate, SendTransactionalEmailRaw
    See the original July blog post for information on how this header affects your email messages. It is our recommendation, that all clients leave this header turned on. If you wish to turn it off, you may do so under Settings --> Unsubscribe Options.

    Thursday, December 17, 2009

    The Rendering/Inbox Preview tool is back in action

    Our rendering/inbox preview tool is back in action, after a hiatus for the last month where the only client that rendered properly was GMail.

    Now, four of the clients will consistently display (Gmail, Outlook, Thunderbird, and Windows Mail), and we're working on bringing AOL, Hotmail, and Yahoo! Mail back to life.

    The reason this tool is so difficult to maintain and service is because a) We coded this feature from scratch, and Inbox Rendering is an extremely difficult process from a software development perspective, and b) Webmail clients are constantly changing, and when a change is made to its login process or its interface, we have to re-code our app to render that client all over again.


    Friday, December 11, 2009

    SMTP service now supports large attachments

    The JangoMail SMTP relay service now supports sending large file attachments in email. Before, there was a limit of approximately 2 MB in total file attachments. Now, there is NO theoretical limit, so the SMTP service can handle file attachments as large as 10 or 20 MB. Of course, email may not be the best medium to transmit such large files, but it is possible with our system.

    JangoSMTP: The Stand-Alone SMTP Service with open tracking, click tracking, DKIM signing, and more.

    JangoMail: The SMTP Service combined with email broadcast service.

    Saturday, December 05, 2009

    Review of Megabus WiFi Internet access

    Running a fast-paced high tech company like JangoMail, I need to be as productive as possible. I am usually either in Chicago (where I live) or in Dayton, Ohio (where I grew up, and where JangoMail is headquartered). Normally I drive between the two cities, because non-stop flights between Chicago and Dayton are upwards of $1,000. Recently, I was told of a bus service called Megabus, which operates a bus route between Cincinnati and Chicago with WiFi Internet access, so tonight, I gave it a shot. With the WiFi, I figured taking the bus I figured would allow me to work for six hours rater than drive for six hours.

    What I wanted to know

    Prior to buying my ticket, I wanted to know the following about the Megabus WiFi access:

    1. How fast was it? Would it be like dialup, or a T1?

    2. Were there any connectivity restrictions? Could I remote into a JangoMail server and deploy a new feature? Could I use GoToMyPC to access my main workstation in Chicago?

    3. Were there power outlets available? My laptop battery only lasts four hours, and my trip was six.

    Googling got me nowhere, as nobody has documented in detail experiences with Megabus's WiFi, so hence the purpose of this article.

    To all tech executives, sysadmins, and those that like to make their web app better while travelling between cities, this article's for you.

    Network Settings

    The above screenshot shows my network settings after connecting to the wireless network with SSID MEGABUS - 64184. Note that I manually put in the DNS server of 8.8.8.8 in an attempt to get around the network's web site blocking, however my attempt was futile.

    The Speed

    The speed various greatly depending on whether the bus is moving or stationary. While stationary, I got reasonable high-speed access. I ran this speed test which shows that I was getting near T1 speeds on the download.


    Above speed was while bus was stationary at Indianapolis stop.

    Above speed test was while bus was in route, half-way between Indianapolis and Chicago.

    The speed between Cincinnati and Indianapolis was the slowest of all, but unfortunately I did not capture a speed test screenshot during that portion of the trip.

    Port Blocking

    All connectivity, except to ports 80 and 443, and DNS lookups, are blocked:
    1. I could not ping any of our servers.
    2. I could not FTP to our server.
    3. I could not connect on port 25 to any mail servers.
    4. I could not Remote Desktop into any servers.
    5. I could not use GoToMyPC to connect to my workstation.
    Web Site Blocking

    Additionally, the WiFi service uses OpenDNS to block many web sites. While I was able to read and respond to email via GMail, and browse Facebook, the following sites were blocked:
    1. MySpace
    2. Google Docs (at docs.google.com), which was odd, because most other Google services were available
    3. Nerve

    Because it was an OpenDNS based block, I suspected that switching to Google's new public DNS server (8.8.8.8) might be a workaround to the blocking. I manually set my Windows TCP/IP settings to use 8.8.8.8 as its DNS server rather than the one dynamically assigned by DHCP, but to no avail. The sites were still blocked, redirecting me to an OpenDNS message.

    The WiFi service is provided by a company called Saucon, and it is free.

    Power Outlets on Megabus


    There were no power outlets on my bus from Cincinnati to Chicago, but I've read (insert link) that some buses do have outlets.

    Resources

    For the official Megabus Saucon WiFi Terms of Use, that you must agree to right when you connect, is here: http://www.saucontds.com/us/index.html

    Wikipedia entry on Megabus - http://en.wikipedia.org/wiki/Megabus

    Megabus Home page - http://www.megabus.com, which oddly enough when I just visited, gave me:

    Shocking that the site goes offline EVERY DAY for 3 hours. In our world of real-time, mission-critical everything, I'm surprised that they would sacrifice 12.5% of the time they could be selling tickets. JangoMail, which I'd imagine is a far more complex app than Megabus's web site, has maintenance running on the back-end almost constantly, and we rarely go offline.

    Tuesday, November 24, 2009

    Test Out Our New Survey Tool

    We just launched the first ever Silverlight-based Survey Design Tool. You can now design and publish email survey invites through the JangoMail interface and view your survey results for each individual participant.

    Set Up Instructions

    1. Click on the new Surveys tab. If you don't have Microsoft's Silverlight Platform installed, you will be prompted to install it at this time. Survey recipients see the survey on a regular webpage and will not need to download Silverlight.


    2. Click the Create a New Survey button to get started. Then choose the Blank survey option.
    3. To create a new question, click in the box under Create a new item.

    Edit the question and answer points by deleting the text that is currently there and typing in your own.
    To use a pre-defined set of answers, click the down arrow next to your answer set.
    To add space for short text answers and comment sections, click on the down arrow in the box under Create a new item. Then click on the type of answer you would like.

    4. When you are done creating your survey, click the Save button.
    5. To make the survey available for people to respond, you must publish it. Click on the Publish tab and then click Publish Survey. Here you will get a link that you can send to people to fill out your survey.
    6. Set your survey to end by navigating to the Close tab and entering in when the survey should close. You can choose to end it immediately, on a certain date, or after a given number of responses.

    Send the Survey
    1. When you publish your survey you will be provided with a link. Copy that link.
    2. Create an email message in the Messages section as you normally would. Paste in the link that you copied where appropriate. After testing your email and your link, send the email out to your survey list.
     

    View Results
    View Recipient-Level Results by clicking on My Surveys in the Surveys section. Click on the Results button next to the survey that you would like to view results for.

    We will soon add results in our Reporting and Analytics section as well.